Welcome to my first Friday of Helpful Christmas Crafts!
NB. I find that a cuppa tea, some chocolate and music are excellent aids to the creative process, though not strictly necessary, perhaps!
I hope directions and photos are clear- I've reduced the size of the published photos in the hopes that it will load faster for yez, but you can click on them to enlarge if you need to, of course! (well, I hope you can...)
Firstly: here are the supplies I used to make the tea lights, the greenery is strands of ivy I pulled out of the hedge just before I begun, so the first thing to do is pick out the dead leaves and grass which came in with it!
(The object with all the Crafts is to use whatever you have to hand, which is why I don't want to give precise ingredients!)
 Oh, the hockey whistle and the Boules jack are accidental, I found them when looking for the wire- I need the whistle for Choir, 120 or so children make a lot of noise!
Take a strand of ivy, measure around the jam jar you are using, to get the size right, and carefully weave the end into a loose circle.
Take care to ease the leaves through the circle as you go or you'll end up with a bald decoration!! Also be careful to bend the strand and not fold it; it won't sit so well if the strand is broken.
 Once you have the size sorted, and the first weaving in, just keep going, weaving the strand around itself. When you reach the end take up a new strand, tuck the end in between where two strands meet, and keep weaving. This is where you have to mind the leaves, I had more than this when I began!
 As you can see, it doesn't look much like anything here, and there are bits sticking out all over the place- this is just fine!
For the next part I used a bit of old crochet wool, but ribbon or even brown twine will work just as well: the intention is to anchor it together so it can be moved without falling apart.
Knot the end of the ribbon on somewhere and wind it around the stems, taking care not to flatten the leaves.
 Tie off the end of the ribbon onto the beginning and trim it neatly. Still looks a right pickle, doesn't it? Fear not!
 Now turn the jam jar the right way up, ease the ivy wreath over the top, and slide it down the jar. You might need to tease some leaves to the outside if they are smooshed against the glass.
 Drop in a tea light, and hey presto! your basic decoration is done!
Extra embellishments in a minute, so set it aside for now.
 This a wire and bead string to wrap around a glass or jar:
 This a wire and bead string to wrap around a glass or jar:
(If you have no beads, use rolled up tin foil balls from your chocolate wrapper!!)
 The length of wire should be several times the circumference of the jar, since with twisting the beads in place you'll shorten it considerably.
 The length of wire should be several times the circumference of the jar, since with twisting the beads in place you'll shorten it considerably.
Thread the first bead onto the wire, and either tie a knot, or twist the wires together like a freezer bag closure.
 Continue to add beads- I left about 1 1/2" or 2" between them, but it shouldn't be exact, its 'craft', not engineering!!
 Continue to add beads- I left about 1 1/2" or 2" between them, but it shouldn't be exact, its 'craft', not engineering!!
Keep adding beads until you run out of either beads, or wire!!
 Coil the wire around the base of the glass or jar. I dropped the leftovers in beside the tea light just for fun.
 If you preferred you could coil the beaded wire around the ivy tea light, instead of having a second light.
 or a length of sequins,
or glue sequins onto some of the stems,
 Coil the wire around the base of the glass or jar. I dropped the leftovers in beside the tea light just for fun.
 If you preferred you could coil the beaded wire around the ivy tea light, instead of having a second light.
Back to the ivy light for some embellishing:
themed buttons, tucked between the strands, or ordinary buttons...I couldn't find any red, but they would be nice,
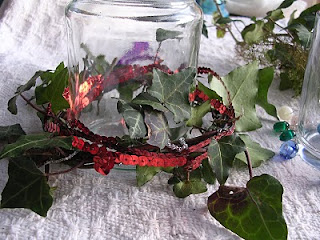
 or a length of sequins,
or glue sequins onto some of the stems,
or spray the whole thing silver or gold...Middlest has run off with my metallic spray, for which she will be sorry when I catch up with her...
 and a last quick trick!
You could always just fill the odd jar with a bit of moss, some shiny beads, and a sequin or two. Set beside, or amongst candles, these will sparkle and look really elegant!
 (It'll also look like you spent artistic hours at it, whereas it takes seconds- I'm all for maximum impression with minimum effort!!)
Ta! Dah! Hope this is useful! Have fun!
 and a last quick trick!
You could always just fill the odd jar with a bit of moss, some shiny beads, and a sequin or two. Set beside, or amongst candles, these will sparkle and look really elegant!
 (It'll also look like you spent artistic hours at it, whereas it takes seconds- I'm all for maximum impression with minimum effort!!)
Ta! Dah! Hope this is useful! Have fun!


