Showing posts with label beads. Show all posts

Thursday, 12 September 2013

Bag Handles...Hag Bangles?

The other day I saw a photo on Pinterest using craft chain and crochet to make bag handles.

So on Monday I bought me two pieces of 40cm chain and tried it out for a bag I am working on at present. It started out as a tote but is turning into a 'kitchen sink' yoke of a smart bag:
 
Its just that it was sitting there looking awfully boring so I thought I'd jazz it up a bit...and I guess I got carried away. Appropriate for a bag though, getting carried away...get it???????


Anyhow, back to the chain. Of course I didn't follow the original picture completely and there was a lot of fiddling and ripping, but I quite like the outcome. Then of course, I started playing with crochet cotton to see how else I could make interesting handles (the thing with handles is that one needs to make two matching and I am not exactly gifted at making things match...)


For the middle one I thought I would thread ribbon or something contrasting through the loops. Perhaps some beads on the tabs after attaching them to the bags...thinking, thinking...

Anyhow that's this week's experiment!

Friday, 5 July 2013

Granny Squares

Yesterday, after hauling my butt round various government offices, the library, the bank, and sundry other really exciting places (including a short cut to the river which was more of a looooong cut...) I sat me down with me feets on the table (hobbit-like) and crocheted. Well I knat (past tense of knit) too, but that was in the evening during Star Trek!

I needed a jug cover, but couldn't remember where the muslin was so just crocheted a doily...a good strong colour of a doily, as my granny would have said. And, in the hopes of it draping ever so slightly I strung a bunch of beads around the edge...horrible plastic beads remaining from an old children's kit of my girls I think.

The result is quite hideous, but for the sake of self-esteem we will refer to it as 'funky'...my #*#*!
Funky doily
It doesn't drape or look good but heck! it'll keep out the dust and the bugs, and I can use it as a coaster later! (or give it away?) Besides which, does this face look bovvered to you?

Then I decided to look up Granny Squares because I couldn't remember how many chains between groups of double crochet and I thought it would save the boggles if I got it right first time. I'm sure boggles have their place but with me they do tend to turn up in the wrong places. I've lots of wool oddments and have wanted to make a Granny Squares afghan for ages.

So, here's the trial sample:

Trial Granny Square.
(There are two chain stitches in between clumps, in case you wondered!)

Short question here:
Just why are they called 'Granny' squares?
Does it mean they should only be crocheted by grannies?
Or they are only fit to be made by grannies?
Or only grannies have the time?
But if they have the time wouldn't grannies be doing far more complicated fancy work?

I was intending to get to some sewing over the next few weeks, partly because I need to do some dressmaking, but firstly I need to clear the sewing table:
A well tidy sewing table.
(Just a little tidying?)

I finished school on Wednesday so am now officially either 'on holiday' or 'unemployed' depending on one's point of view. I am chasing up a few jobs, hours here and there, so we will see. But, either because I'm the eternal optimist or because I'm just a total feather-head, I feel more at peace than I have in months. Maybe its just a combination of faith that God and The State will provide!

Don't know.

Meanwhile I have Granny Squares to crochet! A woman with a mission, ha ha!!

Friday, 26 November 2010

Festive Napkin Rings and Special Offer!

Welcome to this Friday's Crafts! I thought I'd do something quick and easy today, partly as its been a long and busy day for me! Part of this morning was spent in School teaching a class of 6/7 year olds to play hand bells to accompany their song in the Carol Service...great fun...please pass the ear plugs?

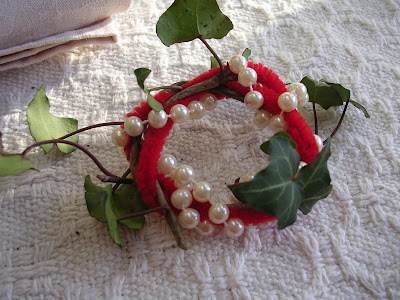
For the Napkin Rings I used 12" pipe cleaners, or chenille sticks, as they appear to be called nowadays, and some funky beads. I don't expect you'll all have the time to rush away to South Africa to get similar beads, but never mind about that!

The size of the beads will probably dictate how many you string onto one pipe cleaner, also, whether you want to conceal the pipe cleaner, or have part showing, as I did.
I bent the pipe cleaner into two loops, pushing one end into a middle bead...
...and then the other end into the same bead...but the two ends can easily go into different beads if you want a wider ring. By pushing the ends into beads, I covered the ends of the wires, which I was afraid might catch on the napkins and snag threads...an important consideration as I intend using the good damask at Christmas.
An alternative Napkin Ring decoration is to twist greenery around a pipe cleaner...
...then loop the pipe cleaner into the correct size...
tuck in the ends...
and twine some beads or sparkles around everything.
You'll notice here that I actually ended up with the Ring too small for all the extra bits I added, so be sure not to do the same. Beads actually take up more of the middle space than one thinks.
Also, greenery won't keep between now and Christmas, so that would add to the last minute jobs.

Finished Napkin Rings!
I thought that as a December Special I would offer a couple of 'freebies' to anyone buying from my Etsy Shop during December, so I've put a notice to that effect in the Shop.
But then I thought that since you, my long suffering Followers, are there for me all the year round, you should have something extra!
So for any Followers buying anything at all from my Shop between now and the New Year, as well as the other things, I'll include one of my Crochet Brooches as well.
(Please remind me that you are a Follower when buying, so you get everything!)
Howzat for bribery and corruption!!
(Would I make a good Politician???????)
'Tee Hee!' as Ladydi would say...!!!

Friday, 12 November 2010

Tealight Holders

(Really sorry for the late posting-we've just come through a 20 hour power cut, which started in the middle of writing this last night, worst for a long time. 5.30 pm now and I'm trying to retrieve what I had done and finish the post ! So sorry.)

Welcome to my first Friday of Helpful Christmas Crafts!

NB. I find that a cuppa tea, some chocolate and music are excellent aids to the creative process, though not strictly necessary, perhaps!

I hope directions and photos are clear- I've reduced the size of the published photos in the hopes that it will load faster for yez, but you can click on them to enlarge if you need to, of course! (well, I hope you can...)

Firstly: here are the supplies I used to make the tea lights, the greenery is strands of ivy I pulled out of the hedge just before I begun, so the first thing to do is pick out the dead leaves and grass which came in with it!

(The object with all the Crafts is to use whatever you have to hand, which is why I don't want to give precise ingredients!)
Oh, the hockey whistle and the Boules jack are accidental, I found them when looking for the wire- I need the whistle for Choir, 120 or so children make a lot of noise!

Take a strand of ivy, measure around the jam jar you are using, to get the size right, and carefully weave the end into a loose circle.
Take care to ease the leaves through the circle as you go or you'll end up with a bald decoration!! Also be careful to bend the strand and not fold it; it won't sit so well if the strand is broken.
Once you have the size sorted, and the first weaving in, just keep going, weaving the strand around itself. When you reach the end take up a new strand, tuck the end in between where two strands meet, and keep weaving. This is where you have to mind the leaves, I had more than this when I began!
As you can see, it doesn't look much like anything here, and there are bits sticking out all over the place- this is just fine!

For the next part I used a bit of old crochet wool, but ribbon or even brown twine will work just as well: the intention is to anchor it together so it can be moved without falling apart.
Knot the end of the ribbon on somewhere and wind it around the stems, taking care not to flatten the leaves.
Tie off the end of the ribbon onto the beginning and trim it neatly. Still looks a right pickle, doesn't it? Fear not!
Now turn the jam jar the right way up, ease the ivy wreath over the top, and slide it down the jar. You might need to tease some leaves to the outside if they are smooshed against the glass.
Drop in a tea light, and hey presto! your basic decoration is done!
Extra embellishments in a minute, so set it aside for now.
This a wire and bead string to wrap around a glass or jar:
(If you have no beads, use rolled up tin foil balls from your chocolate wrapper!!)
The length of wire should be several times the circumference of the jar, since with twisting the beads in place you'll shorten it considerably.

Thread the first bead onto the wire, and either tie a knot, or twist the wires together like a freezer bag closure.
Continue to add beads- I left about 1 1/2" or 2" between them, but it shouldn't be exact, its 'craft', not engineering!!
Keep adding beads until you run out of either beads, or wire!!
Coil the wire around the base of the glass or jar. I dropped the leftovers in beside the tea light just for fun.If you preferred you could coil the beaded wire around the ivy tea light, instead of having a second light.
Back to the ivy light for some embellishing:
themed buttons, tucked between the strands, or ordinary buttons...I couldn't find any red, but they would be nice,
or a length of sequins,

or glue sequins onto some of the stems,

or spray the whole thing silver or gold...Middlest has run off with my metallic spray, for which she will be sorry when I catch up with her...
and a last quick trick!

You could always just fill the odd jar with a bit of moss, some shiny beads, and a sequin or two. Set beside, or amongst candles, these will sparkle and look really elegant!
(It'll also look like you spent artistic hours at it, whereas it takes seconds- I'm all for maximum impression with minimum effort!!)

Ta! Dah! Hope this is useful! Have fun!

Wednesday, 13 January 2010

Of Wrist-Warmers, Pin Cushions and Beads...

'Leg warmers for the arms,' sez Dilly. 'Wrist warmers,' sez I. Funky enough for a Drama student? There was I trying to take photos and she wouldn't stay still...the button doodahs? I got that idea from Jane's wild use of buttons! This is my pin cushion which I made about fifteen years back:
...and here's one I made this morning for fun, with vintage beads and some trimming I found.
I'm going to put it in my Etsy shop later as I'm really happy the way it turned out.

Ages ago Paulette gave us a guided tour of her bead stash, which gave me serious jealousy issues. Since I had my own stash out this morning I thought I'd show you, though its not a patch on Paulette's lovely selection.

S'il vous plait, regardez le tres elegant cardboard box, dans which resides a veritable Aladdin's cave of sparkling....you get the gist...
Et voila, les beads extraordinaire!
You see the old containers- match boxes, tins, Cadbury's Choc box? Isn't it just wonderful?
And the blue satin with all the beads sewn on in leaf and flower motifs?
Would you like the story?

About 1994 ish some ladies were helping an older lady to move from her home into sheltered accommodation, and in order to both reduce the amount of belongings and pay for the move she decided to sell some of her things. I think she hadn't thrown out a single thing since the 1920s so you can just imagine the amount of 'stuff'.

She had, apparently, gone out to East Africa as a bride before 1910, complete with trousseau, and since she was marrying a settler and was an excellent seamstress herself, her trousseau included a number of evening gowns, of which I believe the beaded blue satin to be part of a bodice. From what little I know I think most of the beads are from around the '50s.

One of the ladies gathered all the beads as well as a bag of embroidery transfers and gave me first refusal. I was delighted and have so enjoyed using them, for the 'now' and for the history attached. I hope, when I meet Nancy Rainbow in the 'Hereafter' that I can tell her I put her stash to good use!
This is an evening clutch bag I made for Sos to go with the dress she wore for her 18th birthday last March, using some of the beads and sequins.
And there you have my bead story!

LinkWithin

Related Posts Plugin for WordPress, Blogger...